
The workshop was to prepare us to present documents suitable for Commercial Print. We discussed the different document presents of Book (for advanced book layout 100's of pages with chapters), Library (Collection of assets). Most document presets will be new document.
The page size is the FINISHED PRINTED TRIMMED SIZE
Guides - Number of columns
Margins can be 0 or personal choice to frame text
Bleed is usually 3mm


Short cuts 'W' is to see print preview
Apple shift > increases font size

Applying colour
- Create a frame or type ( Apple shift > increases font size)
Apple shift C Centre / R right/ L left
2 Additional buttons:
T - can apply colour to text
Formatting effects container
2. Add new swatches to Swatch pallet
New colour swatch - the grey square indicates they are Global colours- Allows you to make Global changes to your art work. And also the only way to make tints of a colour.
3. To create a tints swatch use mini menu set up tint swatch
Same method as working with Spot colours
New colour swatch - the grey square indicates they are Global colours- Allows you to make Global changes to your art work. And also the only way to make tints of a colour.
3. To create a tints swatch use mini menu set up tint swatch
Same method as working with Spot colours


Preparation of images for Indesign
In Photoshop
1. CMYK colour mode, grayscale, duotone montone
2. Resolution 300dpi
3. Create it printable size so when in Indesign don't need to change the size
4. File type format = .tiff or .psd * ( ot Jpg as compressed by lowering quality of image)
* Use .psd if working with Transparent areas
Place or prepare a frame in Indesign
If there are any Spot colours in the image they will automatically appear on the Swatch
In Illustrator
1. Colour mode CMYK
2. Artwork is scaleable
3. Format is .Ai
File, place
Check box - show import options default is Boundary Box. Tick transparent background


A vectored image can appear pixelated in indesign as Indesign links and makes low resolution to save space. the only purpose in Indesign is to provide an image for placement and order
Links pallet - keep all images for Indesign in one folder
If you edit the image in Illustrator it will update the image in indesign

Can edit Illusrator/Photohop/ .tiff images quickly by
1. ctl click edit original
or
2. Selection tool, alt double click will open up in illustrator file save.
Using a Grayscale .tiff file
Working with one colour print
Click on circles to select image within the frame
Choose the colour


Colour separations
Printers don't produce composite images
Printing colour separations defines
Print menu
Output
Click on colour
Choose separations
Each print would define the colour and where it falls on the image
It is possible to see the layout separation on the screen
Press window
output
Separations preview
Change new menu to separations to see each colour click on each one
If using this ensure any unused spot colours are deleted otherwise a blank separation plate could be printed out 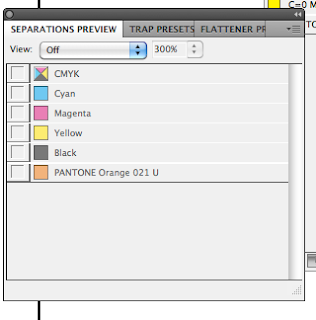

Two spot colours process is knocked out - prevents other colours being made
This is the default setting for process colours
Black ink will overprint
To control whether an ink knocks out or overprints
Need the separations switched on
Window
Output
Attributes
Overprint fill - applies to an object
Only see overprint is for Commercial print (Speak directly to printers)
Can apply too much ink to paper
The ink limit is set to 300% in Adobe
The separations pallet provides the 'Ink limits'
Gloss varnish
Define using a spot colour not used in art work
Let printer know this separation is the varnish
Can use for nets to use for cutting out
Select area where spot colour and using attributes select overprint fill.


No comments:
Post a Comment