Tuesday 13 December 2011

After effects workshop 3

Key Frame interpolation and using illustrator paths

Interpolate to insert between two fixed point.


How After Effects decides how the layer will move between two fixed points.
Default position
A Bezier Curve (as above)like an illustrator path.
Each anchor point has handles to change the curve.

Using the pen tool from the tools pallet - add a vertex (anchor pint, corner pint)
Convert vertex - Can change the interpolation from a smooth curve to a corner point.


Spatial interpolation - Space it occupies
Temperal interpolation - Timeline


select keyframes (by clicking on it)
- Animation menu
-Keyframe interpolation
Can change what happens before and after the selected keyframes 
-Spatial -linear (Converts to a corner rather than curve)
- Temporal- Does not a noticable difference


Further options
To add keyframes or change time  -click and drag layer or click diamond on layer menu

Select all key frames
-Animation menu
-Keyframe interpolation
Temporal interpolation - Linear, bezier, Cont Bezier and 'Hold'

Hold keyframes
No Change between key frames
Changes path from dots (no of frames) between anchor points to no dots.  the Key frames in time line change from a diamond to a backward arrow shape.
The effect is it just jumps from keyframe to keyframe or point to point as no longer moving along a 'path'.  Could use to animate a secondhand on a clock for example or to make something blink or flash

Example is Blink.ai
Import as footage
Using opacity to create blink
from 0% to 100 % on each keyframe
Then use the 'hold' option on keyframe interpolation.

Normal Interpolation keyframes
To make everything quicker select all keyframes
Hold alt key and mover frames back along time line

smooth changes between keyframes
Can manually move keyframes yo space equally along time line 
or
Select all keyframes except for first and last
keyframe interpolation
Roving: (Default is locked to moment when specify property)
* Rove across time (The keyframes change from diamond to circle shapes) and give a smoother change.
Only available for spatial properties ie not Opacity.

Illustrator
Can use Illustrator artwork to create motion paths

Create an Illustrator doc
Create a vector shape
Cope into AE (apple C)
Press P
Click on stopwatch
Edit and paste
This creates a motion path (Ie so can ove in a perfect circle) - A Roving path


The default option is to keep the shape orientation the same
LAYER
Transform
Auto- orientate


Change to orient along a path


Masks


Layer mask - transparency/opaque clipping masks - Illustrator


A layer is usually opaque
Select layer
Click on shape tool
Drag into composition
Created a vector shape (determines which area is opaque and which is transparent)


Four masks properties

Mask path
Mask feather
Mask opacity
Mask expansion

Use the selection tool (Arrow) can manipulate
- If select bounding box (double click the edge) can scale shape or move the shape
- Stop watch - can specify animation for each property


Select layer
Select pentool - create a shape


Can create a 'wipe'
Eg reveal.ai
Import Illustrator file
- CReate a mask by creating a shape ove rthe word
-Cleick on mask path and create keyframes - First keyframe dispappears
the last keyframe us the full mask shape


Can use Illustrator paths as masks

Open Illustrator file 'Melt'
Not text - it is outlines
Copy the characters into AE
Mask path
New solid layer the size of comp
Select layer
Copy text
Each shape will be a mask
Can animate mask shape

Short cut for mask paths

'M' mask path property
Enable keyframe by clicking on O 


Example
DOT.psd
A matte (Photoshop clipping group)
Use one layer to specify which part of another layer can see
The top layer will specify - the 'Matt is on top
- Toggle sitches mode
- Mode, trk Matte, parent
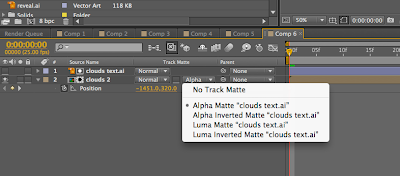
TRK Matte
Dots layer - Drop down layer
Choose the type of matte
Select 'alpha matte
Can invert also


Clouds
With a photoshop layer larger than your composition
Your composition can animate
Use Trk Matte function 'Alpha'


Sunday 11 December 2011

Storyboard workshops

                              Open publication - Free publishing - More float

At the initial workshop we randomly picked our words - Mine were Spin and float.  We were tasked with researching each word as documented on my Design Context blog  for float and also spin   We also had to chose 20 fonts which we thought reflected our words then print them off small, medium and large.
1/12/2012
The following workshop we were tasked with choosing a single letter form from each word and then produce five visualisations, single images which communicate the word. We were allowed to trace off the fonts we had chosen.


The next task was to either continue working with two words or we were able to focus on one word.  We had to produce five idea storyboards and for each idea we had to produce five sequence variations with five frames.  Black and white with one colour.


We also had to get two sets of 25 mim screen grabs of a kinetic type moving image.  The first regular intervals the second 25 'key' frames which demonstrate key changes in the sequence.


These are blogged on my Design practice here.


6/12/11
In the next workshop Fred asked us to draw five 60 cm timelines with 10 regular intervals.  The next task was to fit the 25 frame sequence within this space so that it made sense and you could see all the sequences. It would have helped if I had heard Fred originally say to print these off postage stamp size!  


This was the result of mine:

The whole thing had to be spread over the whole sheet, even though the frames were not the correct size the sequence order is clear.
The second step was to put the 25 key frames across a timeline. This time we were allowed to cut our timeline.  this was the result, mine is the second from the top:


I have learnt what a key frame and timeline is.  I have also learnt when hand drawing storyboards it is advisable to work in seconds or parts there-of rather than in FPS (Frames per seconds).  This avoids producing a 'flick' book of images and forces you to just storyboard key frames.  The problems I encountered with the timeline exercise was working with a 'constrained' set of keyframes which I had printed off too large.  In future I would think about what information i need from a timeline exercise  and also not the frame number and time in the sequence.

The second timeline was useful in terms of enabling us to visualise the pace of the key frames throughout.


7/12/2011
The following workshop with Lorraine was working with our five ideas but now re-drawing this time annotating with time and other notes.  The sequences had to be five seconds long and contain at least five sequences.  We were encouraged to think about pace, so not necessarily equal spaced.  This needed to communicate our idea clearly to another person and also to include title safe zones. 

These are the final sequences on the Issuu book.  After completing these, in small groups we looked at each others work.


8/12/2011
After completing these we in small groups we looked at each others work.
I was with Francesca.  We had to try to tell the 'story' from each other's story boards.  From this we discovered:

1. To give each sequence a number and name so it clearly identifies when one starts and when one ends.
2.  To use arrows to indicate direction .
3. To use time to indicate where in the sequence the frame occurs and give an indication of pace.
4. To use annotation to clarify images.
5.  To think about the title safe zone and what the person will actually see.
6.  To communicate clearly opening and closing frames.
7. May be worth using a viewfinder 


Tuesday 6 December 2011

After Effects workshop 2

Overview
Using Illustrator and Photoshop with After Effects

Indesign works spatially -  You position things within a space
After Effects is a Temporal arrangement - Arrange on a time line.

Photoshop

File sizes have to be correct sizes
File, new

Preset:  Film and dvd
Resolution 72dpi
Colour mode : RGB
Pixel dimension 1050x576 (PAL D1/DV)


THe guides

The guides specify 'safe' zones within which to work. Anything of significance should be kept within the safe zones .  Originally devised for Curved TV screens.

The outer is the action safe zone and the inner is the Title safe zone.


The action safe zone in After Effects


When importing Photoshop files there are several options.

1. Create text as one layer with a TRANSPARENT layer
Save as PSD format to retain transparent layer.

In after effects file, import file
Import as footage - just occupies one layer in the composition


File appears in the project panel (establishes a link with AE files)


Drag down to Timeline (automatically centres in composition window or drag into composition window)
To delete a layer click on the layer then use the back space key to delete.

2. Importing layers - We used 'shatter.psd' as an example

This had several layers, each layer could be animated in AE.

Import in AE as Composition


Imports as a new Composition which is the same length as the original composition and also a layers folder in the project window.  (Although this is not used).


Any project can contain several compositions which may be useful for example when working with different resolutions.

Double click the comp to open
Opens as a new tab in the timeline.
Each layer in each PS exists as a layer in AE.


Can hide or delete layers.

Each layer can have an independent start and end point.

Select all layers
'P' for position in transform tools.


If multiple layer change click on a stop watch all layers will start at the same time.Position playback line as appropriate.


Can also manually move layers in the Composition window by clicking and dragging.


Third option for importing is Composition - retain same layers sizes.

Used an example Scale. psd

In this example each layer is the same size as the comp, the anchor point is in the centre of the layer.

The anchor point is the Centre of rotation/scale.

All layers will scale around the same point.


Each layer has its own anchor point and is specified by what is on the layer.


Each will scale and rotate around their own anchor point.  It also links the motion path to its own anchor point so the path is more distinct.


Illustrator

Use the preset for video and film - 1050x575, RGB
Uses Vectors not pixels.

Can import layers or just footage in same way.

Everything in AE is on Pixels so even though importing as a vector it becomes pixelated in AE. Refer to 'Roll' below


Although can retain vector qualities by using 'Layer switches'.

Layer Switches


The first is the Shy switch which will hide any layer (just switch on) then click on the 4th icon on the tool bar above.  


fx - Enable/disable any effect within a layer (also can help with RAM preview).

The photo film icon is for working with video (blends frames together)


The Quality switch allows you to change the quality of individual layers (if RAM preview can lower quality so speeds up)


Applies motion blur to the layer when clicked, then click the main motion blur switch in the tool bar above.


Motion blur can be adjusted in the advanced menu on the Composition setting menu.  Manipulating angles/shutter speeds alters the intensity.  Larger shutter angles make a more exaggerated motion blur.


The adjustment layer switch is to contain an effectie adjust levels on an a layer


Continually Rasterised switch retains the vector quality of Illustrator files.


Important notes
Save all files and assets in the same folder.  Can collect files as above which will gather together everything your project has used.  This makes a separate copy of everything.