
Design Practice
Showing posts with label OUGD202. Show all posts
Showing posts with label OUGD202. Show all posts
Wednesday, 8 February 2012
End of module Evaluation of Design production: Digital
BA (Hons.) GRAPHIC DESIGN LEVEL 05
Module Code OUGD202
Module Title DESIGN PRODUCTION - DIGITAL
END OF MODULE SELF-EVALUATION
NAME Lisa Whitaker
1. What skills have you developed through this module and how effectively do you think you have applied them?
Although I had a brief introduction to After effects last year for Speaking from experience, I embraced the Mac tutorials and did not try to run before I could walk. I kept the five second silent movies quite simple, using techniques Mike had shown us. One of the most useful techniques was copying paths from Illustrator, particularly effective using the spiral path. Also the significance of different types of key frames ie linear and hold frames contributed. This gave me the confidence to explore more advanced techniques for the second brief such as 3d layers, cameras, lights and using different types of layers to create effects.
I feel comfortable in After Effects and have also learnt some new Illustrator and Photoshop techniques along the way. I have also learnt the importance of storyboarding, frames per second and planning. The key to success with After Effects is methodical file organisation. I feel I have fully utilised what I have learned in After Effects and the other workshops; part from falling down with the storyboarding for the Top ‘10’ and also not having time to analyse the final sequence Post production.
2. What approaches to/methods of design production have you developed and how have they informed your design development process?
The detailed timeline storyboards produced for the five second silent movie assisted with key framing the sequence. Using ‘markers’ in after effects especially along the sound track assisted with making the moving image running in time. Also once set up it avoided having to keep returning to the key frames in the sequence.
Importing Photoshop and layers was integral to the whole top ten sequence and deciding whether to retain layers sizes was also a key decision.
As mentioned above file organisation and also naming conventions were crucial to the success of the Design production. Keeping all the album sequences as separate composition enabled me to create several nested compositions and also take this and experiment with 3D layers and cameras.
3. What strengths can you identify in your work and how have/will you capitalise on these?
Pushing the boundaries of what we were taught in 2d to discover more advanced techniques in 3d meant I achieved a more polished finished result.
I managed to keep on track with the action plan i set on 25th January which meant I achieved the burnt disc for the SHow and Tell on the 7th.
4. What weaknesses can you identify in your work and how will you address these in the future?
I would have liked the Design concept to have a more experimental feel. I think because of the time constraints the outcome is quite literal ie the Album covers. I think if I had spent more time earlier in the research (ie at Xmas) developing the concept I would have been better prepared to run with it earlier in the process.
I focussed on getting across the context as opposed to the actual Graphics and titles which is apparent with the weak finish to the sixty seconds. Focus on this first before the full sequence.
5. Identify five things that you will do differently next time and what do you expect to gain from doing these?
1. Make more time to storyboard to achieve a more considered outcome
2.Be realistic about what can be achieved in the time, the outcome may be simpler but can meet all the requirements of the module
3. Resist the urge to learn too many new techniques and learn how to apply the simpler ones more effectively.
4. Try not to leave printing to two days before the deadline!At least i now have a back up (Rossington Street)if James is not in again. It will give me time to refine the design/layout and print again to achieve a better finish.
5.
6.How would you grade yourself on the following areas:
(please indicate using an ‘x’)
5= excellent, 4 = very good, 3 = good, 2 = average, 1 = poor
1 2 3 4 5
Attendance x 5
Punctuality x 5
Motivation x 4
Commitment x 4
Quantity of work produced 3
Quality of work produced 4
Contribution to the group 4
The evaluation of your work is an important part of the assessment criteria and represents a percentage of the overall grade. It is essential that you give yourself enough time to complete your written evaluation fully and with appropriate depth and level of self-reflection. If you have any questions relating to the self evaluation process speak to a member of staff as soon as possible.

Wednesday, 1 February 2012
Final Crit
At this stage I had reworked my 60 second ident to include 3d layers and cameras but had not yet started the 10 second idents however I had planned to get to this stage so was quite pleased.
On seeing the others work in the group I was disappointed that had not worked on storyboards off screen more but I had just ran out of time - The group was Kirsty F, Emily, James, Eddie, Sarah and Liam.
I am actually really enjoying the crits as it is great to see how people are progressing and also how diverse the approaches to this brief have been. The approach of actually leaving your own questions was a definite improvement as it meant the crit was more directed. Its sometimes easy to focus on what a person has not achieved yet rather than helping them improved what is actually there.


 I have actioned most of the areas for improvement such as
The actions to the crit are documented in the After effects development blog
On seeing the others work in the group I was disappointed that had not worked on storyboards off screen more but I had just ran out of time - The group was Kirsty F, Emily, James, Eddie, Sarah and Liam.
I am actually really enjoying the crits as it is great to see how people are progressing and also how diverse the approaches to this brief have been. The approach of actually leaving your own questions was a definite improvement as it meant the crit was more directed. Its sometimes easy to focus on what a person has not achieved yet rather than helping them improved what is actually there.


- improving readability of text on certain Graphic designers,
- considering the amount of white space (by adding a Vignette),
- the black Sarah referred to is a supposed to represent the thunder and lightening on the PetShop Boys track. I dont think they could hear the track properly in the studio.
- One pair did not pick up the Graphic designers names and one pair did... I think it depends on the audience. the pair that did not pick up the names did not know the albums/music whereas the others did. My audience will be Music lovers/deign/art lovers so I dont think this is a major issue other than making some more readable.
The actions to the crit are documented in the After effects development blog
Tuesday, 24 January 2012
After Effects workshop 5
- Additional key framing techniques
- Simplifying compositions by 'grouping' layers together
- How to add sound to the compositions.
Can apply these techniques to any layers
Working with accelaration and decelaration

Easing in and easing out

Select the first keyframe
Animation menu
Key frame asst.
Ease out to accelerate away from he key frame
To ease in select last keyframe
To ease in and out select both first and last key frames then select Easy Ease


Using the Graph Editor
On the toolbar select Graph editor
Gives and opportunity to change the speed
Can deselect keyframes using handles


Can use purely the Graph Editor instead of easing out/in

Pendulum
Select solid layer then double click elipse to create a elipse
Consider how the object will rotate around the acbchor point
Use the Pan behind tool (y) select anchor point then move as appropriate


Simplify compositions using multiple layers and groups
Parent/Child relationships
Allows you to link layers together
Ensure the layers are positioned how you want them to appear
Establish parent/child relationship using the parent drop down menu next to the layer switches.
The drop down menu shows each of the other layer names.
Select the parent for each layer as relevant
The child layer can be animated independently however always bound to the parent.


Reminer- to get object to follow path - AUTO-ORIENTATE

Can use Rove across time for key frames


Nesting Compositions inside each other
or can create a new comp then nest into a 'main comp.
Audio
Sound files -AIFF or WAV
File/import/open
fixed length
use RAM preview to playback sound
Ensure when add to render queue that audio output switched on as below

After effects workshop 4
Creating text directly in After Effects

Type tool
Click in the Composition window
Can format text in Character pallet
Double click on lyer to select all text
The anchor point is not in middle of layer but at the bottom left corner, This is the centre of rotation.


Type tool
Click in the Composition window
Can format text in Character pallet
Double click on lyer to select all text
The anchor point is not in middle of layer but at the bottom left corner, This is the centre of rotation.


Can reposition the anchor point to the centre using the "pan Behind' tool manually move the anchor point to the centre. Short cut 'Y'
Source text option

Source text allows us to change the content and /or the format of text over time.

Activate source text by clicking Stop watch
Creates Hold frames (square shaped)
Can you this to make text appear alomg...
Also can use to change colour, font, font size,style
To remove keyframes - move time indicator to end of key frames then press stopwatch.
Animate property
Can animate all usual transform properies.
plus fill colour, tracking and line spacing


Position - Now have two positions one in transform and one in text.
RANGE SELECTOR

Specify how much of text is effected by teh animation
eg
all moves
o %
100%
Only half moves
50%
100%

Other options
If for example change start to 40% and end to 60% effect just the middlw section
Can use 'offset' value to move the text eg set keyframe at -100% and one at +100%
This creates a Mexican wave effect.


Advance Options

Units val uses % or Index for Start and end values
Give more control can specify the number of characters
Based on - Characters or Characters excluding spaces
or Words or Lines (eg if working with Paragraphs)
Mode - Overlapping characters that are different colours (blend modes)
Amount- Changes the amount of the property u have changed Can go positive and ngative above and below the line.
Smoothness - Interpolation - Does not show the movement if 0
Animate on Scale
Animate select scale
Each character scales around its own anchor point
This applies to scale and rotation
Use more options - To chnage how scale applied. USe Acnchor point Grouping - choose from 'Character, Word, Line and All
So for example change the SCale %
Range selector - use characters in Advance menu (not %)
Create offset keyframes with '-' and '+' values

Add additional properties to the animator

Adding Spacing - Select Tracking

Adding another property to the animator - Colour - fill colour RGB

Can use the Advanced property - Smoothness - if reduce to o% then will restrict the change to just one character - dont fade out.

Thursday, 12 January 2012
Concept Crit feedback


My group was Charlotte, Max, Francesca, Sadie and Luke. Frankie joined us on the second day
the groups approach to the Top ten was quite diverse from Rocks, patterns, Film Noire, Hangover cures. There was some synergy between Max's (top guitarist) and mine as we were aiming at similar audience and TV channel (BBC4)
I felt unprepared for the first group crit as although I have extensive research I have not though through how to animate or what the tones of voice will be. When I actually discussed my boards and concept with the group I realised I had more of a direction than I had realised.
The learning points from the crit have been:
keep it simple
Need to think about the timing of idents
Think about legibilty
Think about linking from one designer to next - storyboard. Matbe use the symbols from the albums to link
When I discussed possibly using symbols from each album covers Luke shared this than Joe had shared with him:
This is a really simple vector based animation which works so well because of the synchronised sound effects and music.
Tuesday, 13 December 2011
After effects workshop 3
Key Frame interpolation and using illustrator paths
Interpolate to insert between two fixed point.

How After Effects decides how the layer will move between two fixed points.
Default position
A Bezier Curve (as above)like an illustrator path.
Each anchor point has handles to change the curve.
Using the pen tool from the tools pallet - add a vertex (anchor pint, corner pint)
Convert vertex - Can change the interpolation from a smooth curve to a corner point.

Temperal interpolation - Timeline

- Animation menu
-Keyframe interpolation
Can change what happens before and after the selected keyframes
-Spatial -linear (Converts to a corner rather than curve)
- Temporal- Does not a noticable difference


Further options
To add keyframes or change time -click and drag layer or click diamond on layer menu
Select all key frames
-Animation menu
-Keyframe interpolation
Temporal interpolation - Linear, bezier, Cont Bezier and 'Hold'
Hold keyframes
No Change between key frames
Changes path from dots (no of frames) between anchor points to no dots. the Key frames in time line change from a diamond to a backward arrow shape.
The effect is it just jumps from keyframe to keyframe or point to point as no longer moving along a 'path'. Could use to animate a secondhand on a clock for example or to make something blink or flash
Example is Blink.ai
Import as footage
Using opacity to create blink
from 0% to 100 % on each keyframe
Then use the 'hold' option on keyframe interpolation.
To make everything quicker select all keyframes
Hold alt key and mover frames back along time line

smooth changes between keyframes
Can manually move keyframes yo space equally along time line
or
Select all keyframes except for first and last
keyframe interpolation
Roving: (Default is locked to moment when specify property)
* Rove across time (The keyframes change from diamond to circle shapes) and give a smoother change.
Only available for spatial properties ie not Opacity.
Illustrator
Can use Illustrator artwork to create motion paths
Create an Illustrator doc
Create a vector shape
Cope into AE (apple C)
Press P
Click on stopwatch
Edit and paste
This creates a motion path (Ie so can ove in a perfect circle) - A Roving path

The default option is to keep the shape orientation the same
LAYER
Transform
Auto- orientate


Masks
Layer mask - transparency/opaque clipping masks - Illustrator
A layer is usually opaque
Select layer
Click on shape tool
Drag into composition
Created a vector shape (determines which area is opaque and which is transparent)

Four masks properties
Mask path
Mask feather
Mask opacity
Mask expansion
Use the selection tool (Arrow) can manipulate
- If select bounding box (double click the edge) can scale shape or move the shape
- Stop watch - can specify animation for each property

Select layer
Select pentool - create a shape


Can create a 'wipe'
Eg reveal.ai
Import Illustrator file
- CReate a mask by creating a shape ove rthe word
-Cleick on mask path and create keyframes - First keyframe dispappears
the last keyframe us the full mask shape

Can use Illustrator paths as masks
Open Illustrator file 'Melt'
Not text - it is outlines
Copy the characters into AE
Mask path
New solid layer the size of comp
Select layer
Copy text
Each shape will be a mask
Can animate mask shape
Short cut for mask paths
'M' mask path property
Enable keyframe by clicking on O
Example
DOT.psd
A matte (Photoshop clipping group)
Use one layer to specify which part of another layer can see
The top layer will specify - the 'Matt is on top
- Toggle sitches mode
- Mode, trk Matte, parent
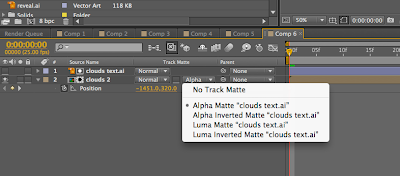
TRK Matte
Dots layer - Drop down layer
Choose the type of matte
Select 'alpha matte
Can invert also


Clouds
With a photoshop layer larger than your composition
Your composition can animate
Use Trk Matte function 'Alpha'

Subscribe to:
Posts (Atom)